1.1 Exploring the lab environment
- 1.1 Exploring the lab environment
- 1.1.1 Objective
- 1.1.2 Ansible Automation Platform command line utilities
- 1.1.3 Architecture of the lab, Nodes and Services
- 1.1.4 Access the Ansible Environment
- 1.1.5 Open and use the Terminal in VS Code
- 1.1.6 Examining automation execution environments
- 1.1.7 Examine the ansible-navigator configuration
- 1.1.8 Your inventory
- 1.1.9 Working the Labs
1.1.1 Objective
The objective of this lab is to provide you a deeper understanding and hands on experience how to automate security tools used by security operators. For that we will tackle three security use cases rather typical for the day-to-day challenges of security operators. While all of them will interact with roughly the same tool set, each use case shows a different perspective (security analyst, firewall operator, IDS specialist) and thus a different point of view on the available tools.
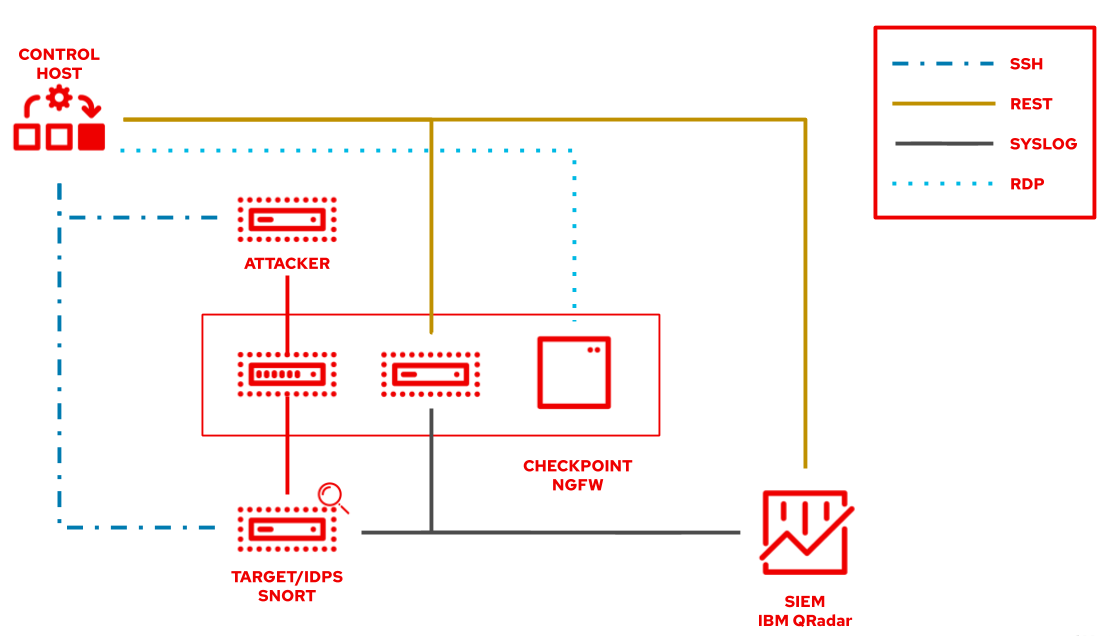
We have set up automation controller and a common set of security related tools:
| Role | Inventory name | Hostname | Username | Password |
|---|---|---|---|---|
| Ansible Control Host | ansible | ansible-1 | - | - |
| IBM QRadar | qradar | qradar | admin | Ansible1! |
| Attacker | attacker | attacker | - | - |
| Snort | snort | snort | - | - |
| Check Point Management Server | checkpoint | checkpoint_mgmt | admin | admin123 |
| Check Point Gateway | - | checkpoint_gw | - | - |
| Windows Workstation | windows-ws | windows_ws | administrator | Provided by Instructor |
| Automation controller | ansible | ansible-1 | admin | Provided by Instructor |
Firewall
- A firewall is a network security device that monitors incoming and outgoing network traffic and decides whether to allow or block specific traffic based on a defined set of security rules.
- We will use Check Point Next Generation Firewall in this workshop.
Security Incident and Events Management (SIEM)
- A SIEM combines security information management (SIM) and security event management (SEM). It offers real-time monitoring and analysis of events as well as tracking and logging of security data for compliance or auditing purposes.
- The workshop will provide you a QRadar SIEM instance.
Intrusion Prevention and Detection System (IDPS)
- Intrusion detection and prevention systems (IDPS) are focused on identifying possible incidents, logging information about them, attempting to stop them, and reporting them to security administrators.
- Our workshop will provide you a Snort instance for the exercises.
The exercises of the first section of this lab guide you through each individual solution mentioned above. You will learn how to access them, what they are used for and how to interact with them using Ansible.
The first exercises will also introduce the Ansible Automation Platform features and command line utilities. Let’s have a closer look at them.
1.1.2 Ansible Automation Platform command line utilities
- ansible-navigator - a command line utility and text-based user interface (TUI) for running and developing Ansible automation content.
- ansible-core - the base executable that provides the framework, language and functions that underpin the Ansible Automation Platform. It also includes various cli tools like
ansible,ansible-playbookandansible-doc. Ansible Core acts as the bridge between the upstream community with the free and open source Ansible and connects it to the downstream enterprise automation offering from Red Hat, the Ansible Automation Platform. - Execution environments - not specifically covered in this workshop because an execution environment has already been integrated into this workshop. Execution environments are container images that can be utilized as Ansible execution.
- ansible-builder - not specifically covered in this workshop,
ansible-builderis a command line utility to automate the process of building Execution Environments.
If you need more information on new Ansible Automation Platform components bookmark this landing page https://red.ht/AAP-20
The exercises of the second section of this lab are focused on the actual security operations use cases: situations in which a certain challenge has to be met, usually by interacting not only with one of the mentioned solutions above, but with a mix of them. After setting forth the challenge and explaining what tasks need to be done manually to solve the situation, the lab walks through the steps to automate the tasks with Ansible.
1.1.3 Architecture of the lab, Nodes and Services
In this lab you work in a pre-configured lab environment. You will have access to the following hosts and services:
Note
The workshop includes preconfigured SSH keys to log into Red Hat Enterprise Linux hosts and don’t need a username and password to log in.
The lab is set up individually for you. You have your own environment, own services, own virtual machines.
For the exercises of section 2 we need to have security incidents. Those should happen on a target machine - that is Snort server. It is basically a RHEL installation with Snort installed and running a simplified web server to run attacks against.
1.1.4 Access the Ansible Environment
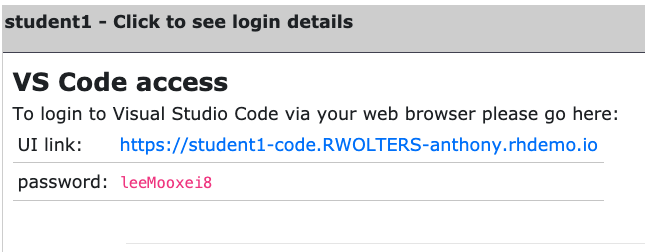
All automation is done from the Ansible control host, a Red Hat Enterprise Linux machine. To make access to the control host and managing files on it easier there is an online version of VS Code editor installed directly on the control host. This way it can be accessed via a normal web browser. Commands can be executed right from the terminal within the VS Code editor.
It is highly encouraged to use Visual Studio Code to complete the workshop exercises. Visual Studio Code provides:
|
|---|
Let’s access the Visual Studio Code. Click on the link for VS Code access from the workshop page:
At this point, you will see a Welcome page:

From within this environment, you can create and modify files or open a terminal and execute commands.
1.1.5 Open and use the Terminal in VS Code
So let’s open a new terminal in VS Code. In the menu bar, click on Terminal > New Terminal.

A new terminal will be opened in the lower part of your editor and you will be at the command prompt. Note that most prerequisite tasks have already been done for you:
-
Ansible software is installed
-
SSH connection and keys are configured
-
sudohas been configured on the managed hosts to run commands that require root privileges.
Note that each student is assigned a student number, i.e. X and you should work as the student
1.1.6 Examining automation execution environments
Next, proceed to check that Ansible Automation Platform has been configured correctly.
[student@ansible-1 ~]$ ansible-navigator images
The result should resemble the following:

Execution environments (EEs) provide developers and operators with a portable and maintainable environment for consistent automation execution throughout development and production.
This workshop uses a custom automation execution environment called security_ee. Let’s have a closer look at it. We can do this by pressing the corresponding number which is 0. Your output should look similar to the below:

Selecting 2 for Ansible version and collections will show us all content collections installed on that particular EE, and the version of ansible-core:

To return to the previous screen in ansible-navigator, press the Esc button. In our case, if you press Esc 3 times, you will return to the prompt.
Note
Please refer to the execution environment documentation for more information.
1.1.7 Examine the ansible-navigator configuration
Either use Visual Studio Code to open or use the cat command to view the contents of the ansible-navigator.yml file. The file is located in the home directory:
$ cat ~/.ansible-navigator.yml
---
ansible-navigator:
  ansible:
    inventories:
    - /home/student/lab_inventory/hosts

  execution-environment:
    image: quay.io/acme_corp/security_ee:latest
    enabled: true
    container-engine: podman
    pull-policy: missing
    volume-mounts:
    - src: "/etc/ansible/"
      dest: "/etc/ansible/"
Note the following parameters within the ansible-navigator.yml file:
inventories: shows the location of the ansible inventory being usedexecution-environment: where the default execution environment is set
Note
For a full listing of configurations, please visit the
ansible-navigatordocumentation.
1.1.8 Your inventory
Let’s open a file in VS Code. In the menu bar, click on File, Open File. In the middle of the screen, a drop down menu opens with the available file content of the home directory of your user:

Pick lab_inventory, this will immediately update the file list. In the new file list, pick hosts. This will open the inventory of your environment.
As you see, the inventory of your environment is provided in a static, ini-type file. It looks like the following listing. Please note that the IP addresses provided here are just an example and will be different in your lab environment:
[all:vars]
ansible_user=student
ansible_ssh_pass=ansible
ansible_port=22

[attack]
attacker ansible_host=99.88.77.66 ansible_user=ec2-user private_ip=172.16.99.66 private_ip2=172.17.44.66

[control]
ansible ansible_host=22.33.44.55 ansible_user=ec2-user private_ip=192.168.2.3

[siem]
qradar ansible_host=22.44.55.77 ansible_user=admin private_ip=172.16.3.44 ansible_httpapi_pass="Ansible1!" ansible_connection=httpapi ansible_httpapi_use_ssl=yes ansible_httpapi_validate_certs=False ansible_network_os=ibm.qradar.qradar

[ids]
snort ansible_host=33.44.55.66 ansible_user=ec2-user private_ip=192.168.3.4 private_ip2=172.17.33.77

[firewall]
checkpoint ansible_host=44.55.66.77 ansible_user=admin private_ip=192.168.4.5 ansible_network_os=checkpoint ansible_connection=httpapi ansible_httpapi_use_ssl=yes ansible_httpapi_validate_certs=no

[windows]
windows-ws ansible_host=55.66.77.88 ansible_user=Administrator ansible_pass=RedHat19! ansible_port=5986 ansible_connection=winrm ansible_winrm_server_cert_validation=ignore private_ip=192.168.5.6
All the IP addresses are specific to your environment. Whenever the exercises ask you to access a certain machine, you can always look up the IP in the inventory on the control host.
Ansible is already configured to use the inventory specific to your environment. As shown in the example above, the inventory carries more than just the host names and IP addresses. Especially in the case of the Windows workstation, several more parameters are set.
Note
Not all hosts in your lab can be reached via SSH or WinRM. Some are accessed via REST API, RDP or web browser. During the exercises, each node type will be explained in detail and how to access the resources will be shown step by step.
1.1.9 Working the Labs
You might have guessed by now this lab uses the command line frequently… So we recommend that you don’t type everything manually, use copy & paste from the browser when appropriate. But stop to think and understand.
Navigation
Next Exercise
Click here to return to the Ansible for Red Hat Enterprise Linux Workshop