Intro
In this section we will show you step by step how to add pre commit linting to a repository. You will be able to use this on the command line to lint your code and use it in a github repository. The lab already has git repo created and cloned onto your vscode instance.
Pre Steps
If you are using the Workshop, a Workshop project should be available in your VSCode for you to push to the Workshop Gitea server. Create the files in this project folder.
NOTE: If when you click on the Explorer tab that looks like two pieces of paper and you see "Open Folder" click on that. In the popup window click windows-workshop/workshop_project/ (full path is: `/home/student/windows-workshop/workshop_project`) then click "ok". If prompted select the check box and "Yes, I trust the authors" option. You should now see a readme that has a typo saying Welcome to Windows Automation workshop.
Step 1
Ensure that you have pre-commit installed on your machine. On the VScode toolbar you should see Terminal then in the dropdown select New Terminal.
sudo pip3 install --upgrade pip
sudo pip3.9 install pre-commit
NOTE: Normally we would suggest dnf install pre-commit but in this lab we will have to use pip3
Next, configure pre-commit to a pre-hook action.
pre-commit install
Further documentation for those who are interested to learn more see:
Step 2
Create a file that links to the pre-commit hooks that you want to use. In our case, some general cleanup hooks, yamllint, and ansible-lint.
Create a file in this folder path .pre-commit-config.yaml
---
repos:
  - repo: 'https://github.com/pre-commit/pre-commit-hooks'
    rev: v4.3.0
    hooks:
      - id: end-of-file-fixer
      - id: trailing-whitespace
  - repo: 'https://github.com/ansible/ansible-lint.git'
    rev: v6.16.2
    hooks:
      - id: ansible-lint
        pass_filenames: false
        always_run: true
        entry: "ansible-lint"
        args:
          - "--profile=production"
        additional_dependencies:
          - "ansible-core>=2.13"
          - "yamllint>=1.26,<2.0"
...
Create a yaml lint file .yamllint.yml to hold our yaml rules.
---
extends: default

ignore: |
  changelogs
  vault.yml
rules:
  # 80 chars should be enough, but don't fail if a line is longer
  line-length: disable
  colons:
    max-spaces-before: 0
    max-spaces-after: -1
  document-end:
    present: true
  document-start:
    present: true
  indentation:
    level: error
    # Require indentation https://redhat-cop.github.io/automation-good-practices/#_yaml_and_jinja2_syntax
    spaces: 2
    indent-sequences: true
    check-multi-line-strings: false
  truthy:
    level: error
    # Allow only YAML 1.2 booleans https://redhat-cop.github.io/automation-good-practices/#_yaml_and_jinja2_syntax
    allowed-values:
      - 'true'
      - 'false'
...
Further documentation for more hooks that can be added can be found here:
Step 3
To use this in github set the workflow action in a file.
Create a file in this folder path .github/workflows/pre-commit.yml
---
name: Yaml and Ansible Lint

on: [push, pull_request]  # yamllint disable-line rule:truthy

jobs:
  pre-commit:
    runs-on: ubuntu-latest
    steps:
      - uses: actions/checkout@v2
      - uses: actions/setup-python@v2
      - name: Install Collections
        run: |
          sudo apt install software-properties-common
          sudo apt-add-repository --yes --update ppa:ansible/ansible
          sudo apt install ansible
      - uses: pre-commit/action@v2.0.0
...
Further documentation for more hooks that can be added can be found here:
Step 4
Now lets create some git files.
Create a file .gitignore which we will use to tell git to not include some files.
.password
ansible.cfg
ansible-navigator.log
*.json
Next let’s create a .gitattributes file
*.yml linguist-detectable
*.yaml linguist-detectable
Further documentation for more hooks that can be added can be found here:
Step 5
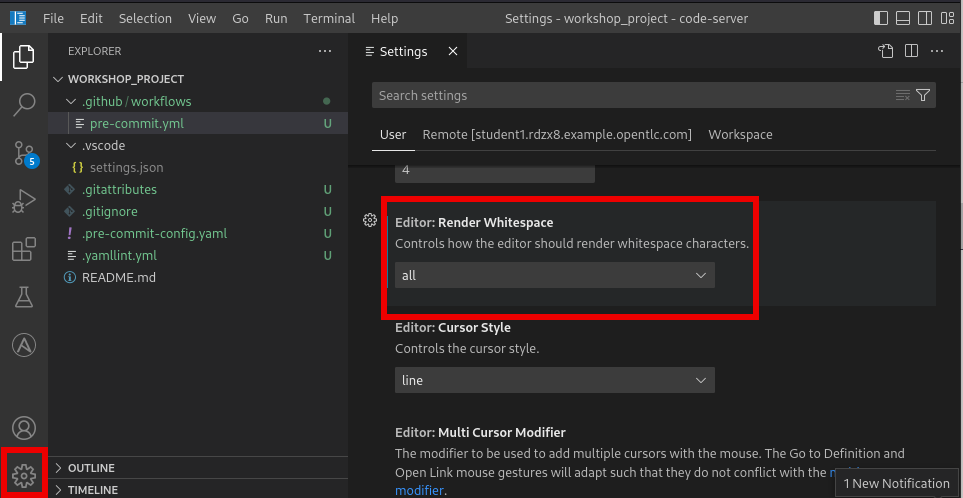
In your VSCode at the bottom left corner is a gear, click it and select Settings. Roughly the 5th option down should be Editor: Render Whitespace change it from none to all. This will help you visualize all the whitespace when you are working with documents.
Step 6
Commit your current work so far. (note we won’t mention it again but you should commit and push at the end of each section)
git add .
git commit -am "task0 complete"
git push origin master
NOTE: It is likely you will get a failed commit the first attempt due to end of line auto fixes taking place, if this happens just run the commit again and everything should be green.
NOTE: also if you get an error about credential helper run git config --global --unset credential.helper and then do your commit again.