Read this in other languages:
 English,
  日本語.
日本語.
This exercise aims to introduce how Ansible makes it easy to control all aspects of managing Windows software using Chocolatey. We will cover Installing, updating and uninstalling packages, managing different sources, configuring chocolatey clients and other common tasks that a system administrator would take on.
So what is Chocolatey anyways? Simply put, Chocolatey is a package management system for Windows. Chocolatey aims to simplify software management, making it easier to automate your entire Windows software lifecycle.
The open source Chocolatey client offers basic package management functionality, while the Chocolatey For Business suite provides an advanced feature set. Some highlights include:
- Package Builder allows you to take any EXE, MSI, zip, or script and automatically turn it into a Chocolatey package in as little as 5 seconds (and figures out the installer silent arguments for you).
- Package Internalizer takes the 8000+ packages that maintainers have already built for you in the Chocolatey Community Repository, and creates localized offline versions for you to use internally (including dependencies);
- Package Synchronizer will allow you to create Chocolatey packages for applications listed in Programs and Features, and allows you to manage them like any other package.
- Chocolatey Self-Service GUI allows end-users the ability to manage packages without requiring admin rights or elevated permissions.
- Chocolatey Central Management is a web dashboard and API (similar to Automation Controller) giving you that high-level overview and reporting of your entire estate of endpoints.
Section 1: The win_chocolatey module
Step 1 - Install a package using an ad-hoc command
To start, we will use an ad-hoc command to install git using the win_chocolatey module. The win_chocolatey module is a part of the chocolatey.chocolatey collection, and is used to manage packages on a Windows system using Chocolatey.
Tip
The
chocolatey.chocolateycollection is one of the certified partner collections available on Automation Hub.
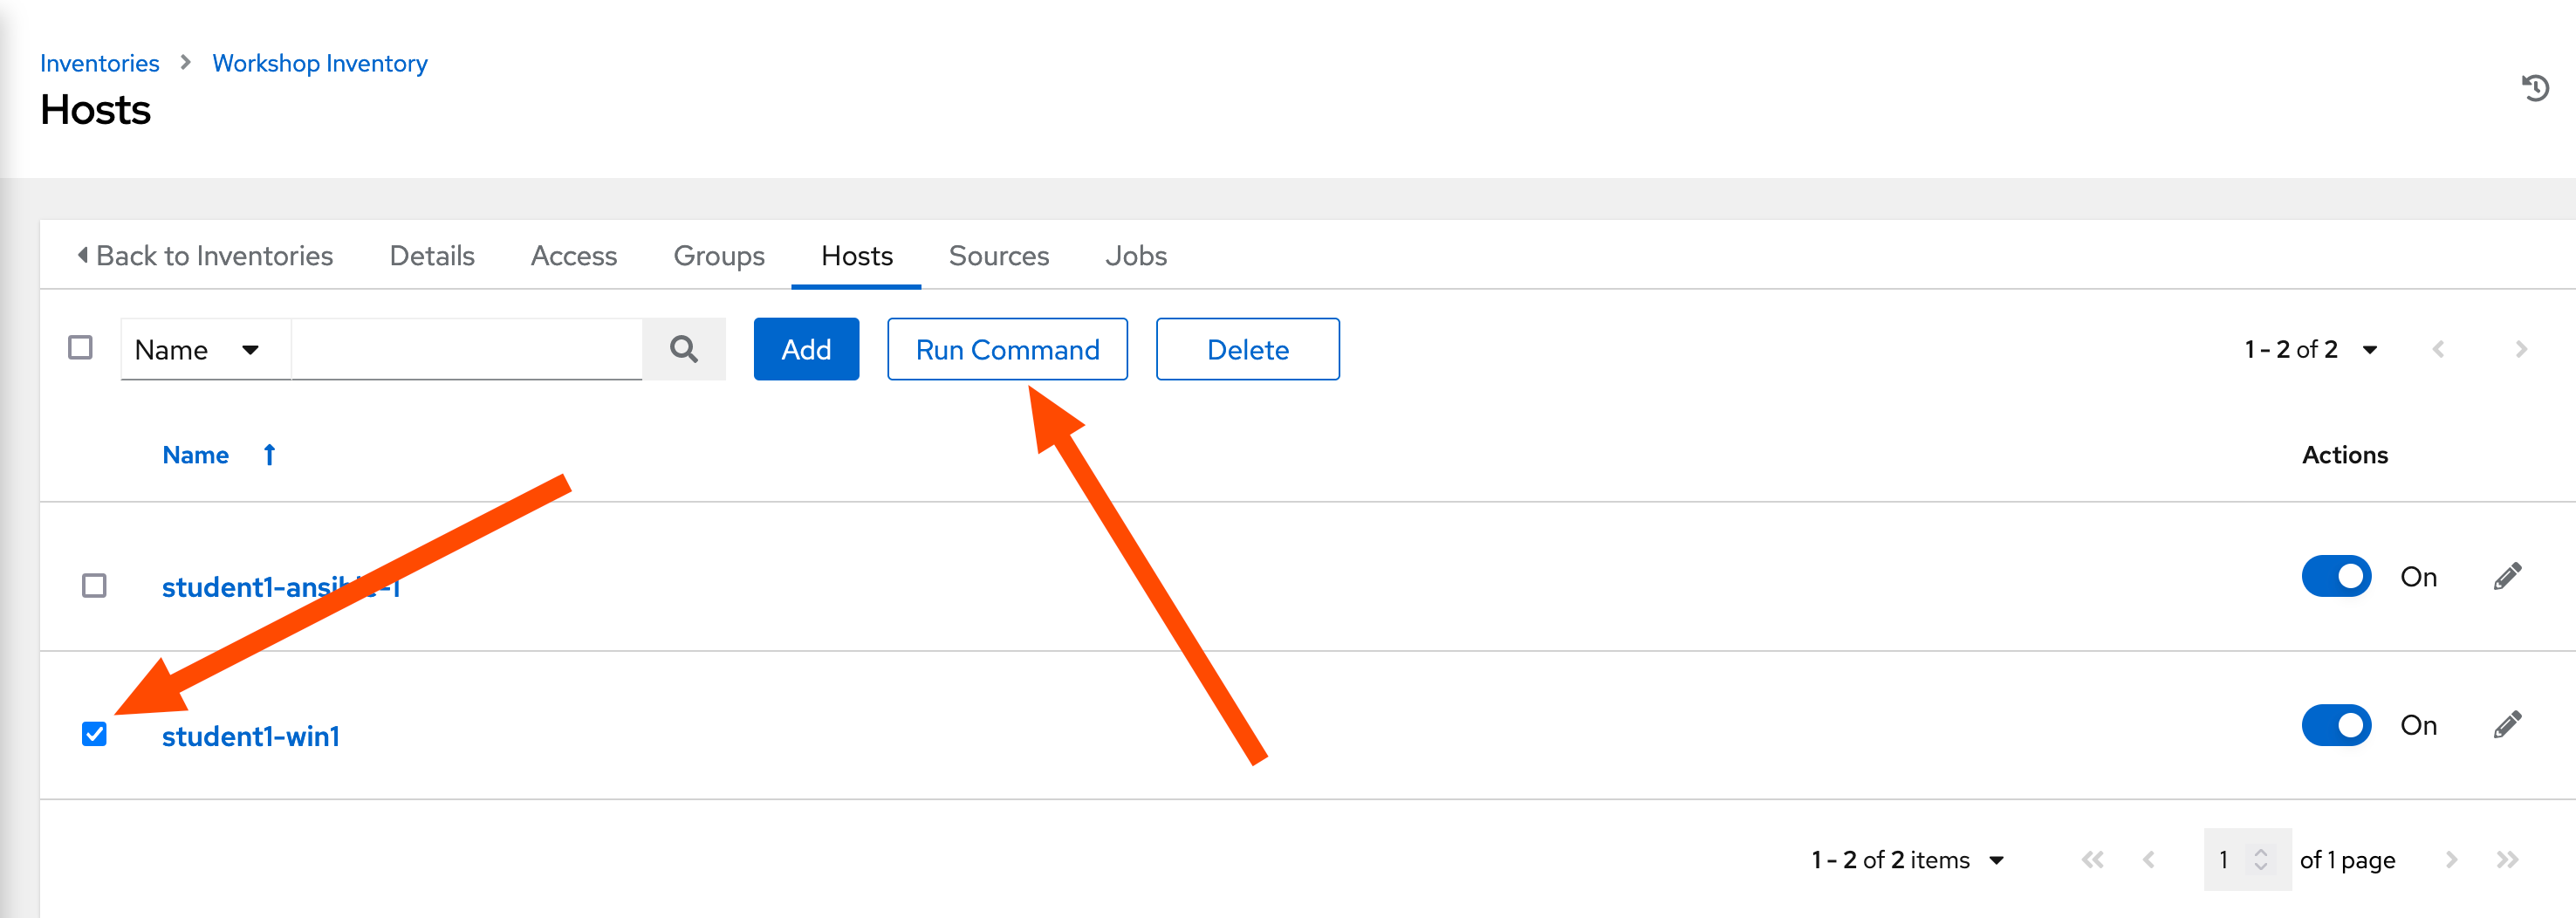
To start, we will need to go to our Inventory. So click Inventories on the left panel, and then click the name of our Inventory Workshop Inventory. Now that you are on the Inventory Details page, we will need to go select our Host. So click HOSTS.
Next to each host is a checkbox. Check the box next to each host you want to run an ad-hoc Command on. Select the Run Command button.
This will pop up the Execute Command window. Fill out this form as follows:
| Key | Value | Note |
|---|---|---|
| Module | win_chocolatey |
|
| Arguments | name=git state=present |
The name and state of the package |
| Limit | This should display the host you selected in the previous step |
Click the Next button
| Key | Value | Note |
|---|---|---|
| Execution environment | windows workshop execution environment |
Click the Next button
| Key | Value | Note |
|---|---|---|
| Machine credential | Workshop Credential | |
Click the Next button, and once you click LAUNCH you will be redirected to the Job log.
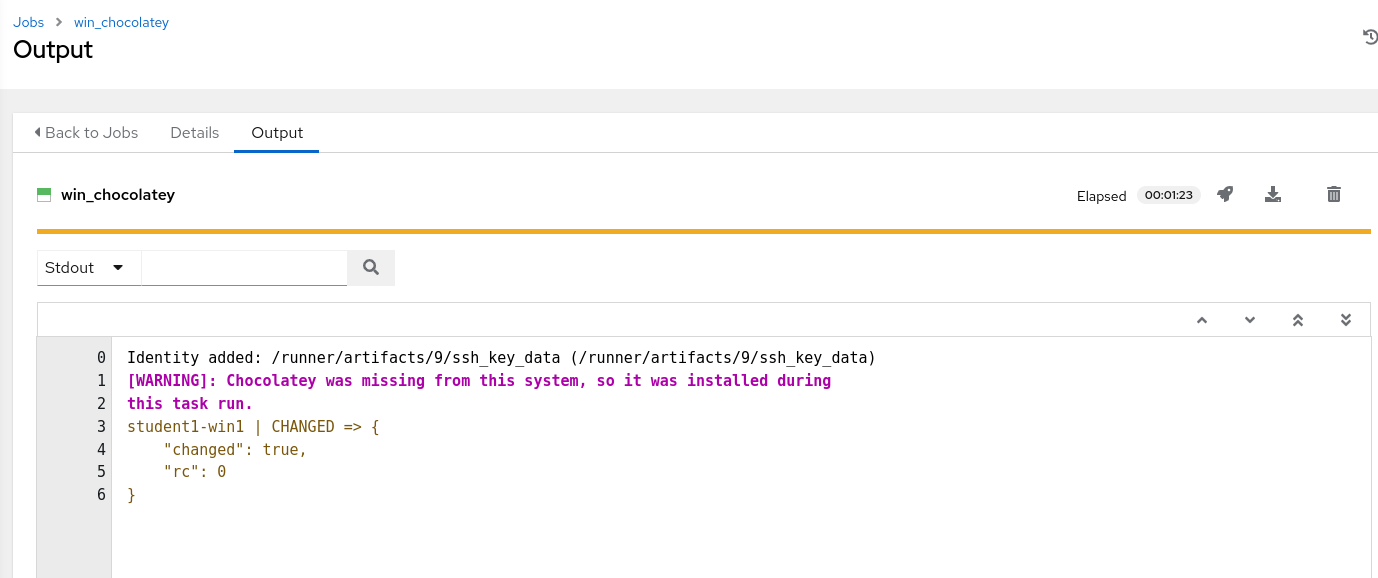
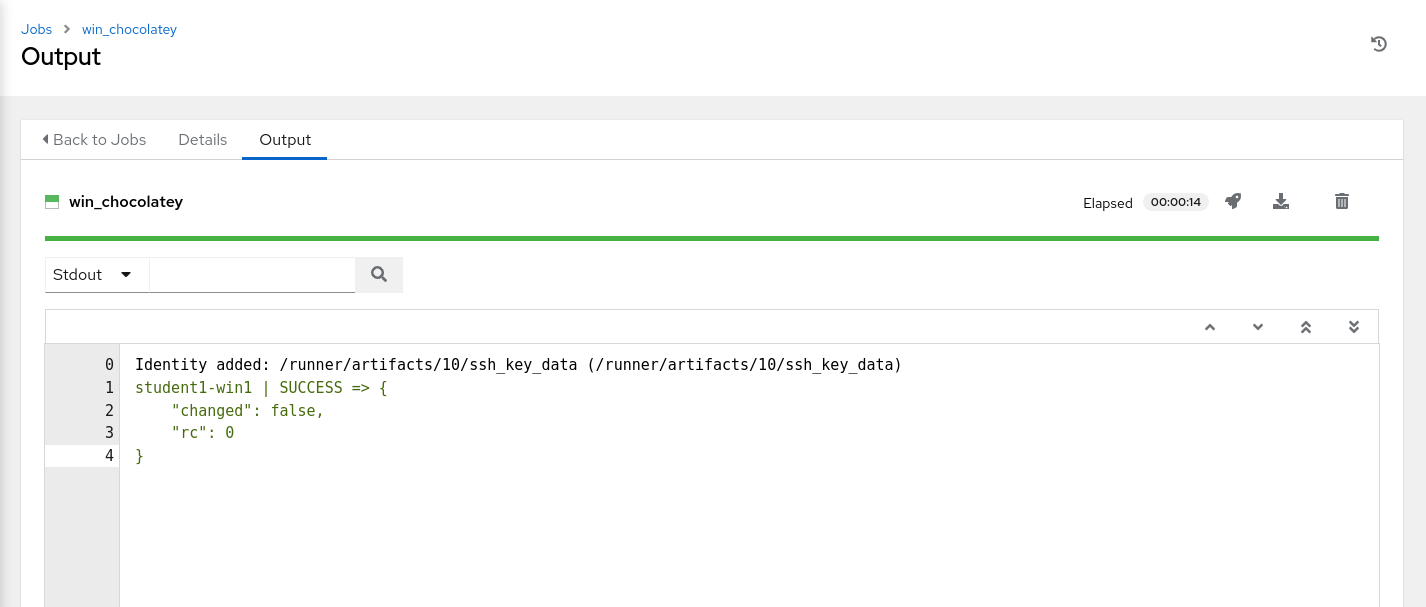
We see that the output reports a CHANGED status to indicate that git was installed. The results also shows a warning that the Chocolatey client was missing from the system, so it was installed as a part of this task run. Future tasks that use the win_chocolatey module should now detect the client and use it without the need to install anything. To verify, re-run the job by clicking on the rocketship icon in the Output section, the output now should not have a warning, and will also not report any changes, but instead a SUCCESS status as the win_chocolatey module (like most Ansible modules) is idempotent (the run will also take less time because as the previous run installed 2 packages, this run installs none).
And just like that we have git installed.
Step 2 - Install multiple packages with specific versions
In the last step we installed one package in an ad-hoc fashion, however in reality it is more likely that we would want to include package installation as one step in a multi step play. It is also likely that we would want to install multiple packages (possibly even specific versions of said packages). In this exercise we will be doing just that.
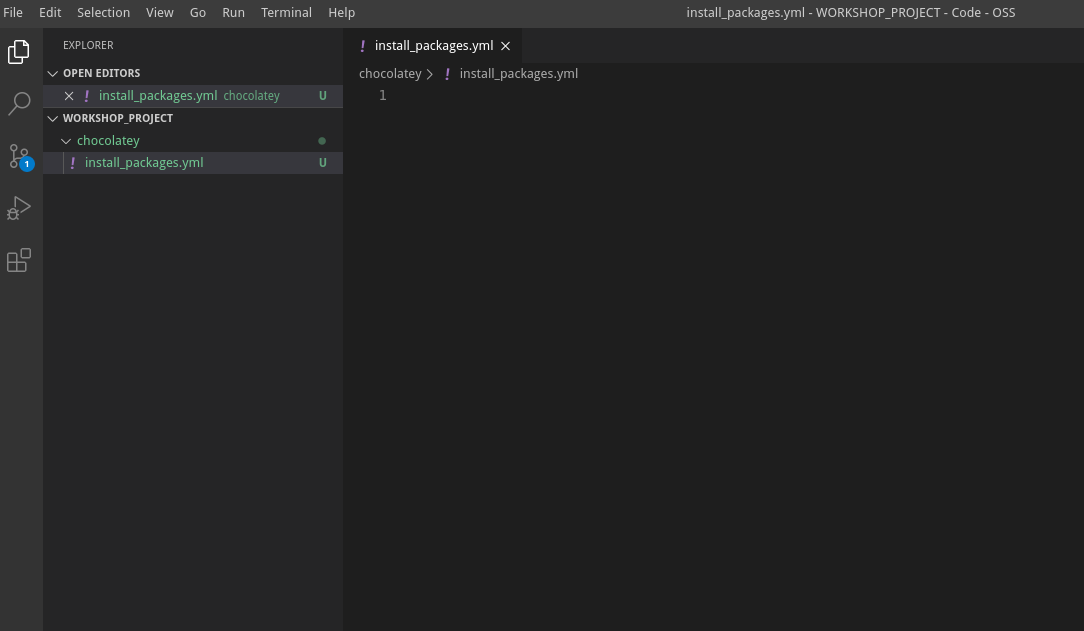
Let’s start by going back to Visual Studio Code. Under the WORKSHOP_PROJECT section Create a directory called chocolatey and a file called
install_packages.yml
You should now have an editor open in the right pane that can be used for creating your playbook.
First we will define our play:
---
- name: Install Specific versions of packages using Chocolatey
  hosts: all
  gather_facts: false
  vars:
    choco_packages:
      - name: nodejs
        version: 13.0.0
      - name: python
        version: 3.6.0
Since we will not need or use any of the facts gathered by Ansible, we have disabled fact gathering by setting gather_facts: false to decrease overhead. We also defined one dictionary variable named choco_packages under the vars directive to hold the names and versions of the packages we want to install using Chocolatey.
Next we will add our tasks:
  tasks:

  - name: Install specific versions of packages sequentially
    chocolatey.chocolatey.win_chocolatey:
      name: "{{ item.name }}"
      version: "{{ item.version }}"
      force: yes
    loop: "{{ choco_packages }}"

  - name: Check python version
    ansible.windows.win_command: python --version
    register: check_python_version

  - name: Check nodejs version
    ansible.windows.win_command: node --version
    register: check_node_version

  - ansible.builtin.debug:
      msg: Python Version is {{ check_python_version.stdout_lines[0] }} and NodeJS version is {{ check_node_version.stdout_lines[0] }}
We added 4 tasks to the tasks section:
- The first task uses the
win_chocolateymodule from thechocolatey.chocolateycollection, and will loop over thechoco_packagesvariable to install each product with the specified version - The second and third tasks use the
win_commandmodule from theansible.windowscollection to execute commands to check the version ofpythonandnoderespectively, registering the output of each. - The fourth and final task used the
debugmodule from theansible.builtincollection to display a message containing the information gathered in steps 2 and 3.
Tip
The
win_chocolateymodule’snameattribute can actually take a list of packages avoiding the need for a loop, however using a loop will allow you to specify the versions of each package, and install them sequentially if order is relevant. for more information on thewin_chocolateymodule take a look at the docs.
The completed playbook install_packages.yml should look like this:
---
- name: Install Specific versions of packages using Chocolatey
  hosts: all
  gather_facts: false
  vars:
    choco_packages:
      - name: nodejs
        version: 13.0.0
      - name: python
        version: 3.6.0
  tasks:

  - name: Install specific versions of packages sequentially
    chocolatey.chocolatey.win_chocolatey:
      name: "{{ item.name }}"
      version: "{{ item.version }}"
      force: yes
    loop: "{{ choco_packages }}"

  - name: Check python version
    ansible.windows.win_command: python --version
    register: check_python_version

  - name: Check nodejs version
    ansible.windows.win_command: node --version
    register: check_node_version

  - ansible.builtin.debug:
      msg: Python Version is {{ check_python_version.stdout_lines[0] }} and NodeJS version is {{ check_node_version.stdout_lines[0] }}
Now that the playbook is ready:
- Save your work by Clicking
File > Savefrom the menu (or using the Ctrl+S shortcut). - Commit your changes to git - use a relevant commit message such as Adding install_packages.yml.
- Push the committed changes to your repository by clicking the circular arrows.
- (Optional) Verify that your code is in git by going to GitLab using the information under GitLab Access.
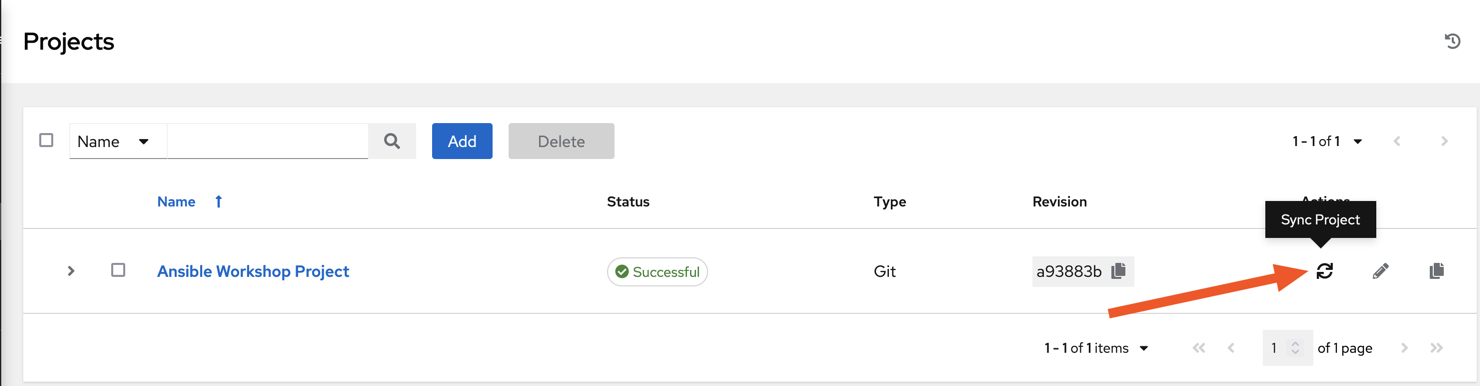
Now head back to Automation Controller, and sync your Project so that Controller Picks up the new playbook. Click Projects and then click the sync icon next to your project.
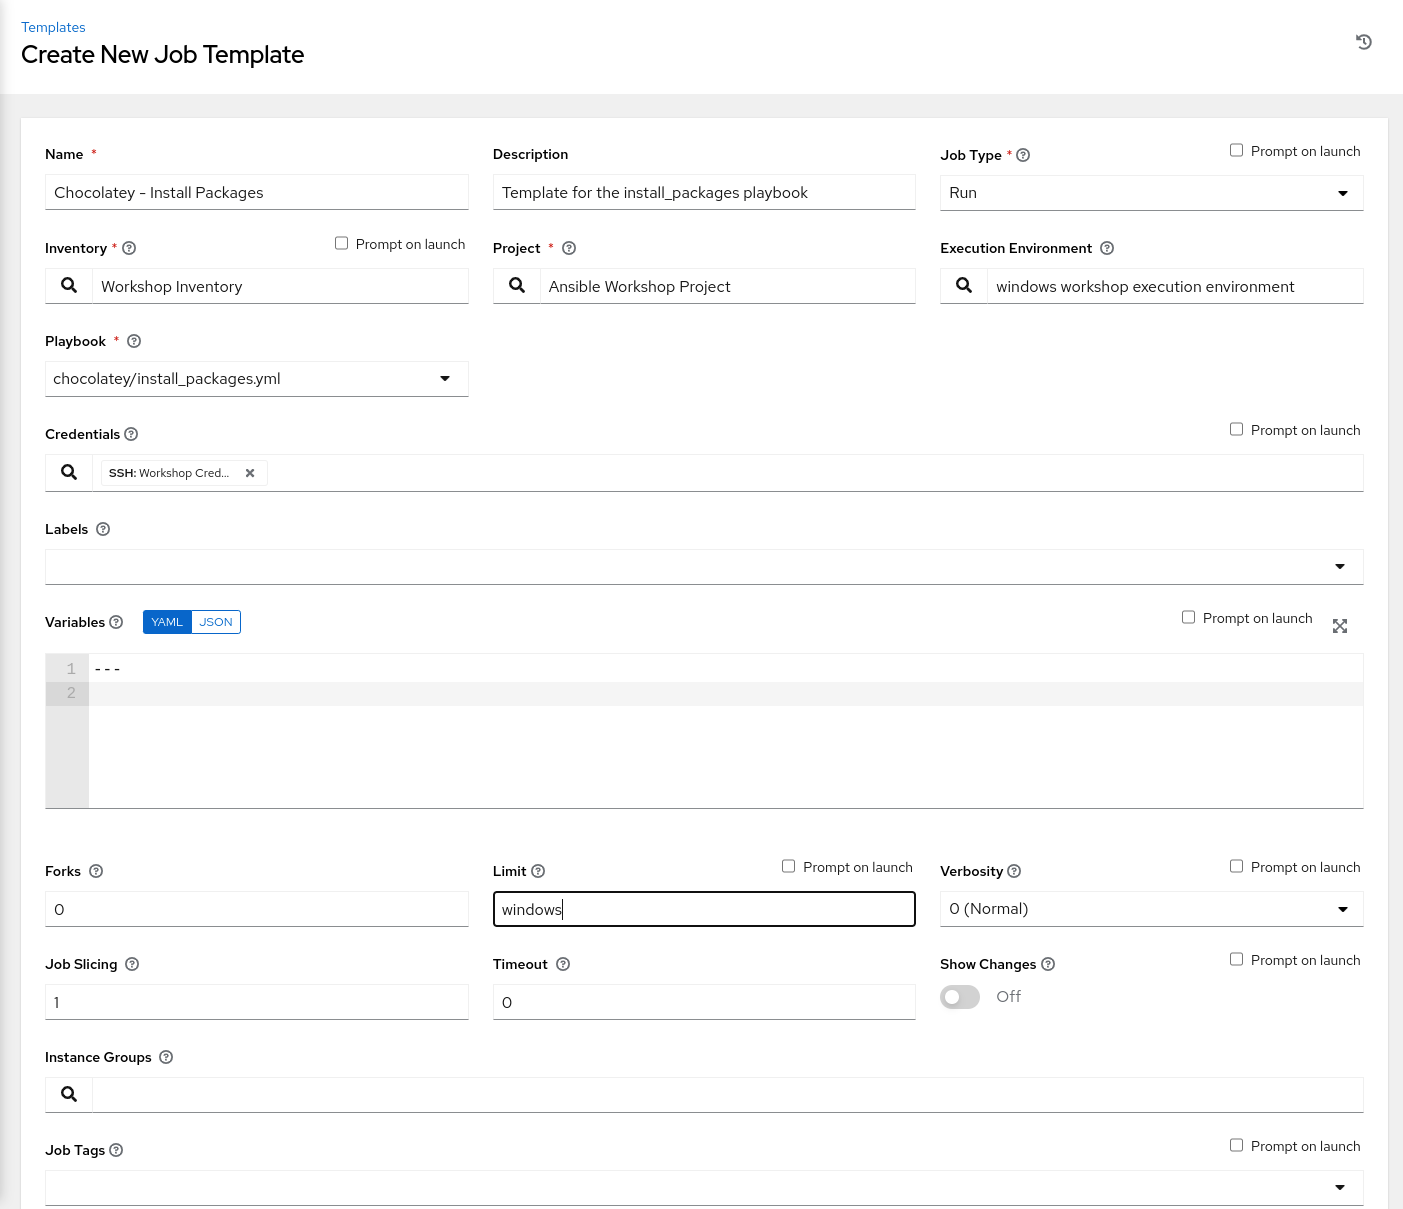
Once this is complete, we will create a new job template. Select Templates and click on the  icon, and select Add Job Template. Use the following values for your new Template:
| Key | Value | Note |
|---|---|---|
| Name | Chocolatey - Install Packages | |
| Description | Template for the install_packages playbook | |
| Job Type | Run | |
| Inventory | Workshop Inventory | |
| Project | Ansible Workshop Project | |
| Execution Environment | windows workshop execution environment | |
| Playbook | chocolatey/install_packages.yml |
|
| Credential | Type: Machine. Name: Workshop Credential | |
| Limit | windows | |
| Options |
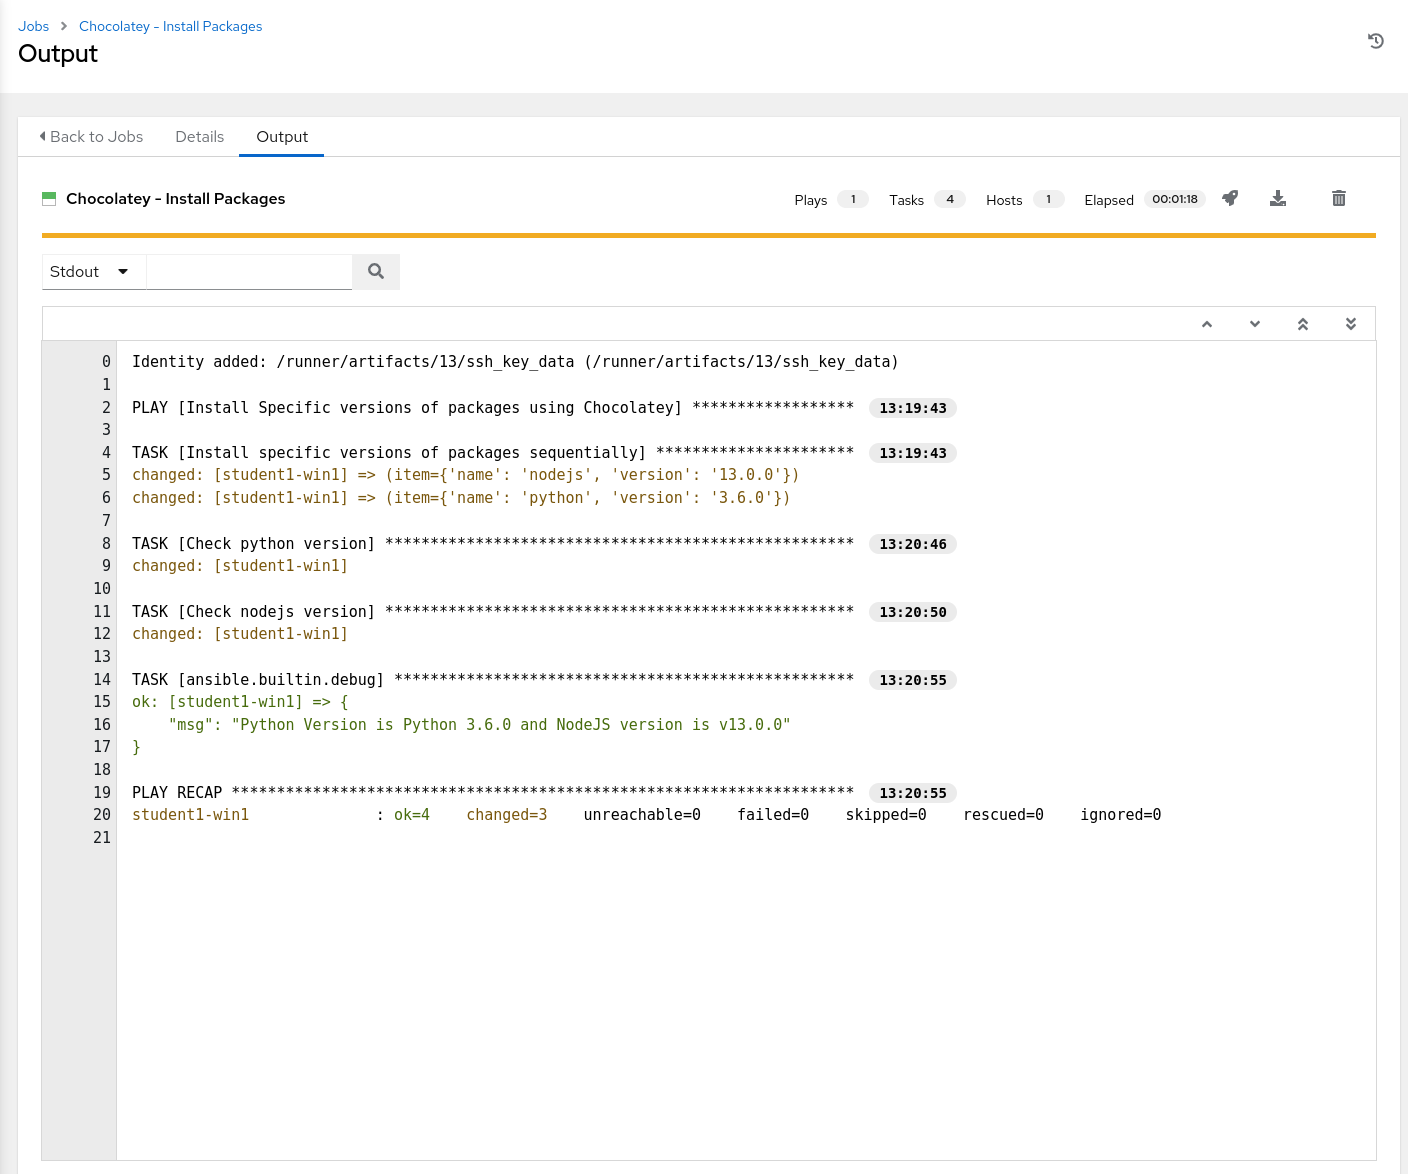
Click SAVE and then Click LAUNCH to run the job. The job should run successfully and you should be able to see Ansible looping and installing the packages specified in our variable
Tip
By now you should be familiar with the flow of creating or editing playbooks, committing your changes and pushing them to git. You should also be comfortable with refreshing your project, creating and running job templates in Automation Controller. Later steps will no longer list each and every step to do so.
Step 3 - Updating all installed packages
The win_chocolatey module can do more than just install packages, it is also used to uninstall and update packages. The action the module does is based on the value you pass to the state parameter. Some of the options you can pass include:
present: Will ensure the package is installed.absent: Will ensure the package is not installed.latest: Will ensure the package is installed to the latest available version.
The last playbook did not explicitly define and set a value for state, so the default value present was used as the set value to the state parameter to install packages, however we installed older versions of packages on purpose, so now we want to update those packages.
In Visual Studio Code, create a new file under the chocolatey folder with the name update_packages.yml. In this playbook we will create a play that uses the win_chocolatey module with latest passed in as a value to the state parameter. Since we want to update all the packages previously installed by Chocolatey, no specific package name will be provided to the name parameter, instead the value all will be used.
Tip
Information on using
allas a value that will be set to thenameattribute can be found in thewin_chocolatey’s module docs. Always check the documentation of a module that you are using for the first time, often there will be useful information that will save you a lot of work.
The contents of update_packages.yml are:
---
- name: Update all packages using Chocolatey
  hosts: all
  gather_facts: false
  tasks:

  - name: Update all installed packages
    chocolatey.chocolatey.win_chocolatey:
      name: all
      state: latest

  - name: Check python version
    ansible.windows.win_command: python --version
    register: check_python_version

  - name: Check nodejs version
    ansible.windows.win_command: node --version
    register: check_node_version

  - ansible.builtin.debug:
      msg: Python Version is {{ check_python_version.stdout_lines[0] }} and NodeJS version is {{ check_node_version.stdout_lines[0] }}
The other tasks are there so that we can verify the versions of nodejs and python after the update task has been run. And that’s it, simple right?
Now go ahead and make sure your new playbook is in Git, and that Automation Controller can see it, and then create and run a new Job template with the following values:
Tip
Sine Almost everything will be similar to the first job template we created to install packages, you can
copythat job template by going toTempatesand clicking on theicon next to the
Chocolatey - Install Packagestemplate. This will create a copy of that template that you can then Edit by clicking on its name, clicking on Edit and making the changes to the name, description and playbook to run. Make sure that the project us updated first otherwise the new playbook will not be available to use. If you prefer you can also create a new jpb template from scratch, the choice is yours.
| Key | Value | Note |
|---|---|---|
| Name | Chocolatey - Update Packages | |
| Description | Template for the update_packages playbook | |
| Job Type | Run | |
| Inventory | Workshop Inventory | |
| Project | Ansible Workshop Project | |
| Execution Environment | windows workshop execution environment | |
| Playbook | chocolatey/update_packages.yml |
|
| Credential | Type: Machine. Name: Workshop Credential | |
| Limit | windows | |
| Options |
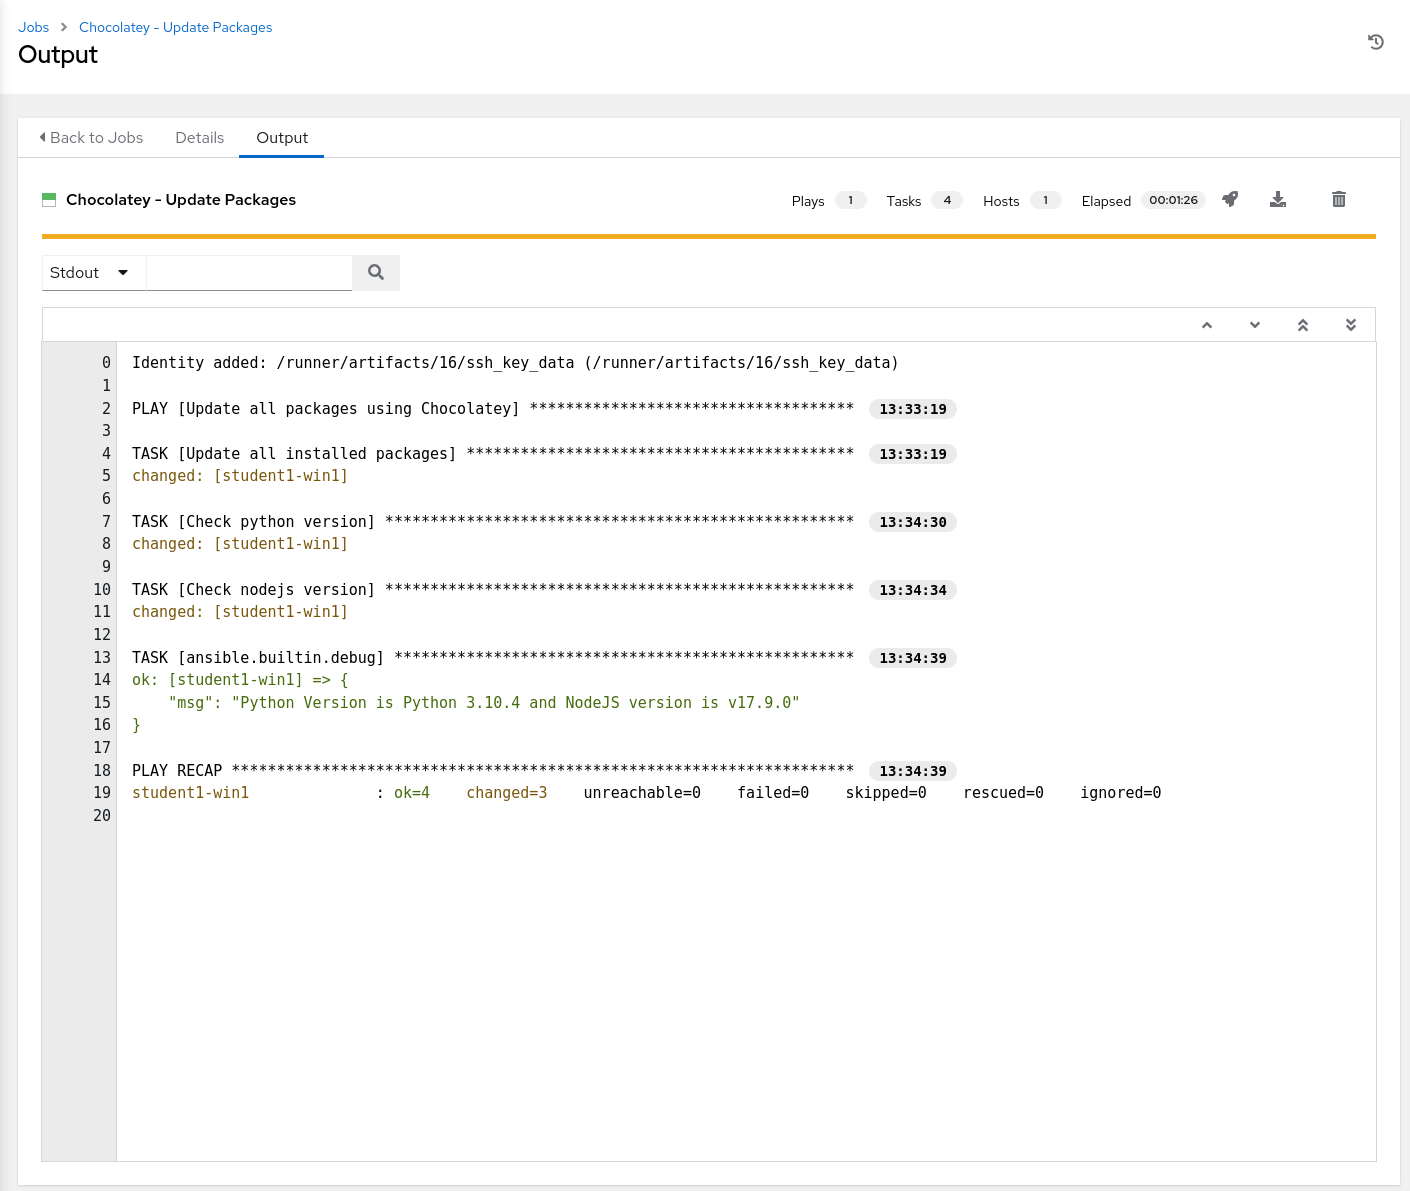
After running the new Template, examine the debug task message, and compare the versions to the ones from the install_packages job output. The versions should be higher as those packages were updates (the git package that we installed using an adhoc command will also be checked for an update - unlikely that there will be one after minutes of installation).
Section 2: Chocolatey facts and configurations
Even though the win_chocolatey module is what actually is used to manage packages with Chocolatey, it is not the only Chocolatey module available in the chocolatey.chocolatey Ansible collection, there are other modules to help you manage and configure Chocolatey on your Windows targets. In this exercise we will take a look at two of them: win_chocolatey_facts and win_chocolatey_config
Step 1 - Gathering Chocolatey facts
The first module we will use is the win_chocolatey_facts module from the chocolatey.chocolatey collection. This module is used to gather information from Chocolatey, such as installed packages, configuration, features and sources, which is useful for tasks suck as report generation, or conditionals defined on other tasks.
Tip
Read more on the
win_chocolatey_factsin the docs.
So let’s take a closer look at the information gathered by this module by writing a simple playbook to collect and display the collected information.
In Visual Studio Code, under the chocolatey folder, create a new file called chocolatey_configuration.yml. The contents of that file should be as follows:
---
- name: Chocolatey Facts and Configuration
  hosts: all
  gather_facts: false
  tasks:

  - name: Gather facts from Chocolatey
    chocolatey.chocolatey.win_chocolatey_facts:

  - name: Displays the gathered facts
    ansible.builtin.debug:
      var: ansible_chocolatey
The first task uses win_chocolatey_facts from the chocolatey.chocolatey collection to gather all the available information from Chocolatey on the target Windows machine, and will store this information in a variable named ansible_chocolatey, which is using the debug module from the ansible.builtin collection to print the contents of to examine them closer.
Add your new playbook to your source control repo, and sync your project in Automation Controller, then create and run a new job template with the following values:
| Key | Value | Note |
|---|---|---|
| Name | Chocolatey - Facts and configuration | |
| Description | Template for the chocolatey_configuration playbook | |
| Job Type | Run | |
| Inventory | Workshop Inventory | |
| Project | Ansible Workshop Project | |
| Execution Environment | windows workshop execution environment | |
| Playbook | chocolatey/chocolatey_conguration.yml |
|
| Credential | Type: Machine. Name: Workshop Credential | |
| Limit | windows | |
| Options |
The output of the job should show you the contents of the ansible_chocolatey variable collected in the first task.
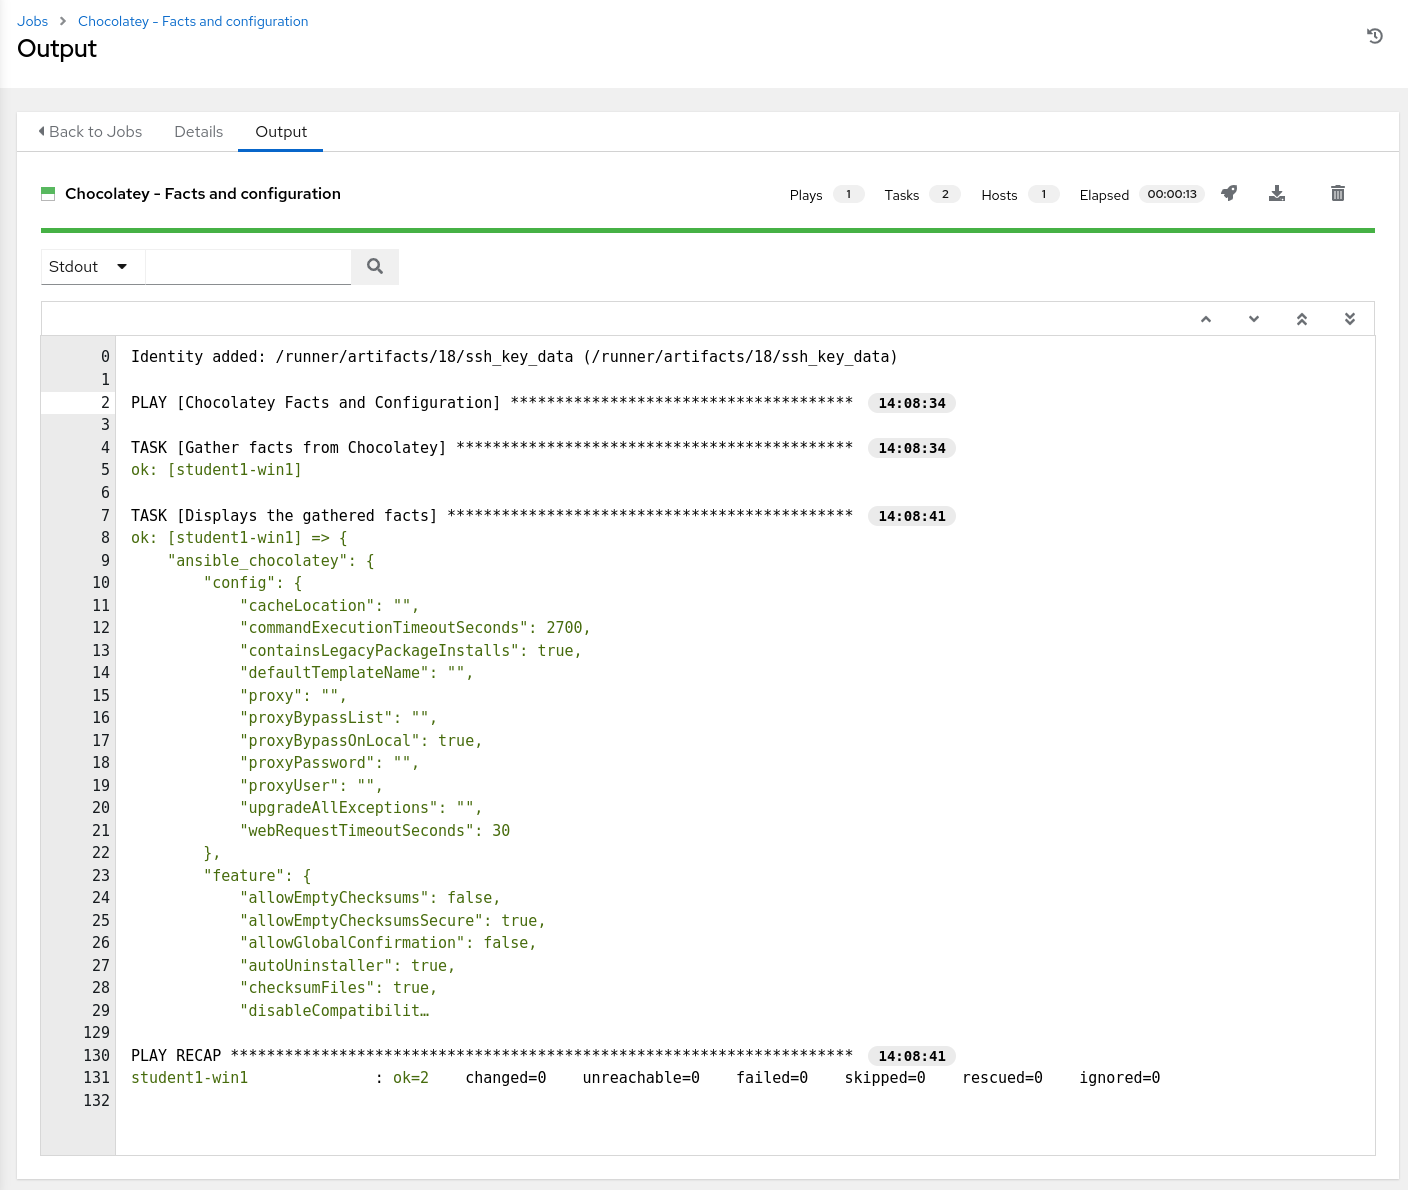
Scroll through the output and observe the values, you can see the configuration of the Chocolatey client on the Windows target, the enabled and disabled features, the installed packages (do you see the packages we installed in previous exercises?) as well as the sources from which we are installing packages (more on this later!). Note that this information is in a JSON format, so you can access individual values by traversing the object tree. For example if I am only interested in information on the installed packages to let’s say generate a report of installed packages, I can use the ansible_chocolatey.packages key to access those values.
Tip
We really did not need to use a
debugtask just to see the information collected by thewin_chocolatey_factsmodule, instead, in Automation Controller’s job output pane click on the result of running the task on the Windows target, which will open the host details dialog for that specific host, which shows information about the host affected by the selected event and the output of that event (In this case, the JSON object returned by thewin_chocolatey_factsmodule run can be seen under theJSONtab in the dialog box)
Step 2 - Configuring Chocolatey
In the previous step, we saw that we can gather the configurations of the Chocolatey client on the windows target using the win_chocolatey_facts module, but what if we want to modify those configurations? Well, there is a module for that!
The win_chocolatey_config module from the chocolatey.chocolatey collection can be used to manage Chocolatey configurations by changing the values of configuration options, or unsetting them all together.
Tip
Read more on the
win_chocolatey_configin the docs.
Tip
Read more on Chocolatey configuration here.
We will change the values of two configuration options: cacheLocation and commandExecutionTimeoutSeconds. In the output of the previous step we saw that the cacheLocation was unset or did not have a value configured - the default setting, and that the value for commandExecutionTimeoutSeconds was set to the default value of 2700. We will modify those configuration options to:
- set
cacheLocationtoC:\ChocoCache. - set
commandExecutionTimeoutSecondsto 1 hour or3600seconds.
In Visual Studio Code, edit the chocolatey_configuration.yml playbook, to add the following tasks:
  - name: Create a directory for the new Chocolatey caching directory
    ansible.windows.win_file:
      path: C:\ChocoCache
      state: directory

  - name: Configure Chocolatey to use the new directory as the cache location
    chocolatey.chocolatey.win_chocolatey_config:
      name: cacheLocation
      state: present
      value: C:\ChocoCache

  - name: Change the Execution Timeout Setting
    chocolatey.chocolatey.win_chocolatey_config:
      name: commandExecutionTimeoutSeconds
      state: present
      value: 3600

  - name: ReGather facts from Chocolatey after new reconfiguring
    chocolatey.chocolatey.win_chocolatey_facts:

  - name: Displays the gathered facts
    ansible.builtin.debug:
      var: ansible_chocolatey.config
These new tasks will perform the following:
- Create the directory
C:\ChocoCacheusing thewin_filemodule from theansible.windowscollection. - Modify the value of
cacheLocationto the newly created directory usingwin_chocolatey_configfrom thechocolatey.chocolateycollection. - Modify the value of
commandExecutionTimeoutSecondsto3600. - Re gather the Chocolatey facts after modifying the configuration values.
- And Finally print out the
configsection from the refreshed Chocolatey facts.
The contents of the chocolatey_configuration.yml playbook should now look like this:
---
- name: Chocolatey Facts and Configuration
  hosts: all
  gather_facts: false
  tasks:

  - name: Gather facts from Chocolatey
    chocolatey.chocolatey.win_chocolatey_facts:

  - name: Displays the gathered facts
    ansible.builtin.debug:
      var: ansible_chocolatey

  - name: Create a directory for the new Chocolatey caching directory
    ansible.windows.win_file:
      path: C:\ChocoCache
      state: directory

  - name: Configure Chocolatey to use the new directory as the cache location
    chocolatey.chocolatey.win_chocolatey_config:
      name: cacheLocation
      state: present
      value: C:\ChocoCache

  - name: Change the Execution Timeout Setting
    chocolatey.chocolatey.win_chocolatey_config:
      name: commandExecutionTimeoutSeconds
      state: present
      value: 3600

  - name: ReGather facts from Chocolatey after new reconfiguring
    chocolatey.chocolatey.win_chocolatey_facts:

  - name: Displays the gathered facts
    ansible.builtin.debug:
      var: ansible_chocolatey.config
Commit your changes and push them to source control, sync your project in Automation Controller and run the Chocolatey - Facts and Configuration job template.
Tip
Back in exercise 1, when you created the project in Automation Controller, you checked an option to
UPDATE REVISION ON LAUNCH- so we did not really need to refresh the project in Controller, but just in case that option was missed…
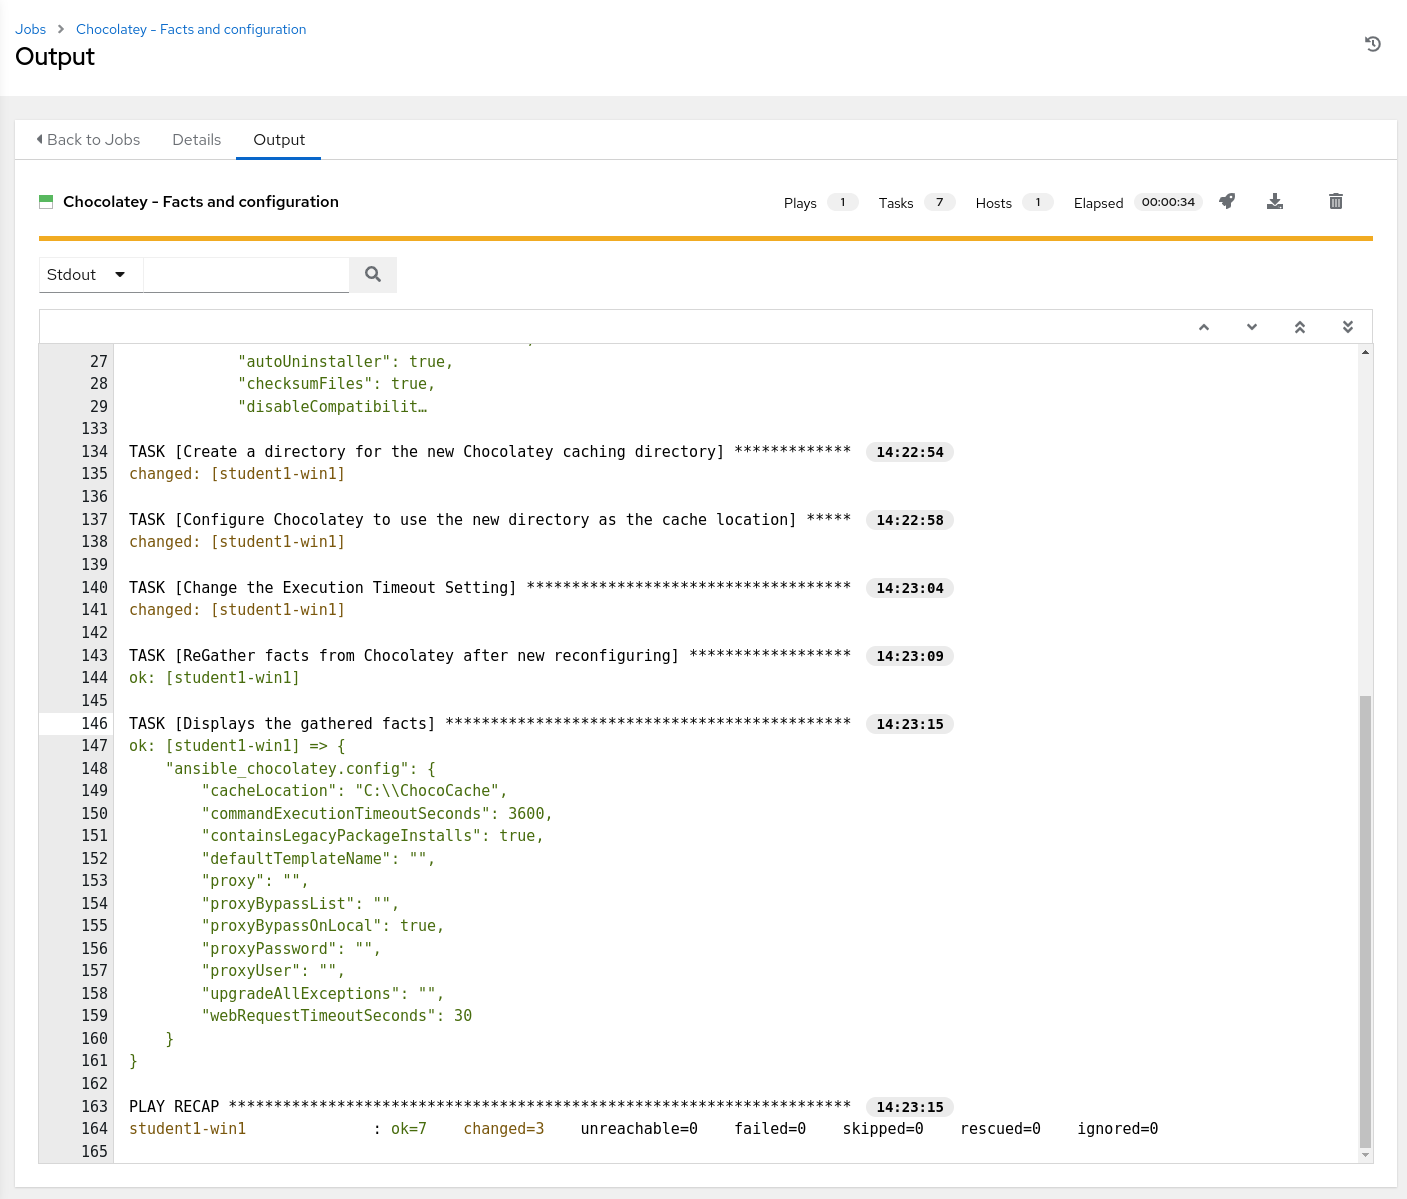
The playbook should run and make the configuration changes, and the output from the last debug task showing the value of the ansible_chocolatey.config variable should reflect those changes and show the new values for cacheLocation and commandExecutionTimeoutSeconds.
And thats it. This exercise covered most Chocolatey related Ansible modules available (with the exception of win_chocolatey_source and win_chocolatey_feature which you can read about here and here. Hopefully you got a taste of the possibilities by using Ansible together with Chocolatey and the chocolatey.chocolatey collection to manage your Windows packages.